
SERVICE TIPS
Replacement timing depends on the conditions you ride in, type of terrains, and riding style. Always better to replace the parts before it gets worn out.
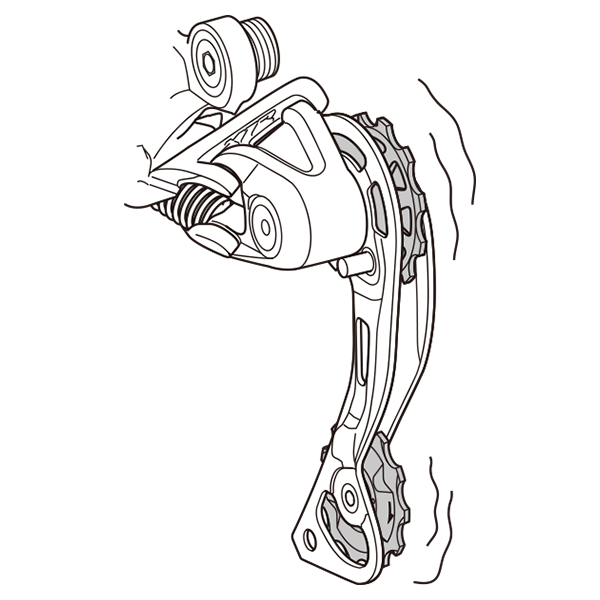
Rear Derailleur Pulley
If you hear abnormal noise as a result of looseness in a pulley, you should replace the pulley.
Cables (brake and shift)
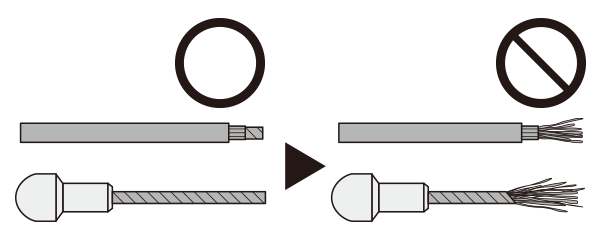
When? - Check with a professional mechanic at least once a year (depends on your riding conditions)
- When increased friction, damaged
Why? - Possibility of degradation
- Dust occurred by friction
- Gets rusty
What happened if not replacing? - Cable disconnection
- Troubles with shifting, braking
Notes - Preventive maintenance is necessary
Cassettes
If the chain keeps coming off the chainrings during use, replace the chainrings and the chain.
Products are not guaranteed against natural wear and deterioration from normal use and aging.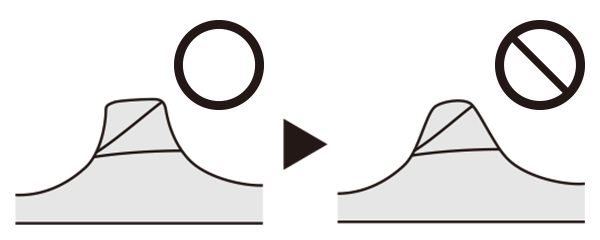
When? - Chain skipping, poor rear shifting
- Once in every 3 to 5 chain replacements
Why? - Possibility of degradation
- Dust occurred by friction
- Gets rusty
What happened if not replacing? - Shifting troubles occur and wear of cassette and chainrings is accelerated
Notes - A key to cassette lifespan is keeping the chain clean and lubed
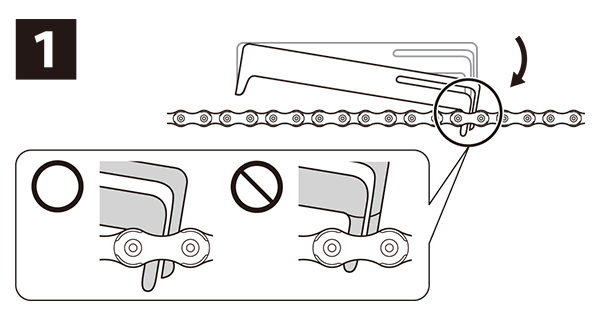
Chain
You should periodically wash the chainrings in a neutral detergent. In addition, cleaning the chain with neutral detergent and lubricating it can be an effective way of extending the useful life of the chainrings and the chain.
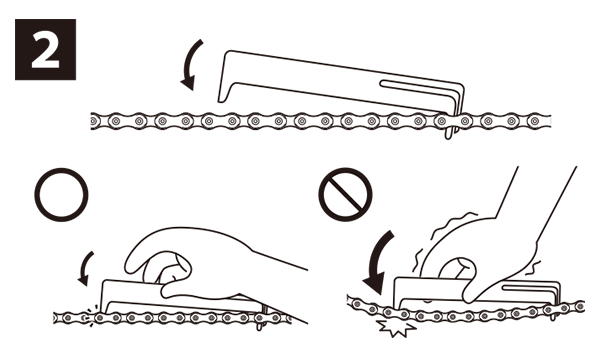
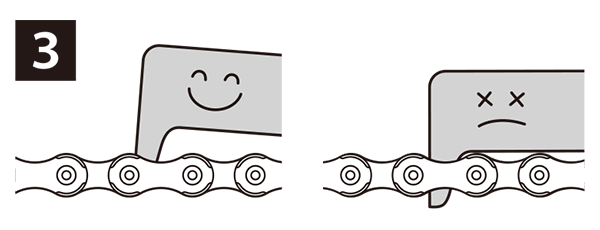
SHIMANO Chain Wear Indicator
SHIMANO chain wear indicator allows you to check the chain wear accurately, easy and quickly in its unique way.
The checker measures chain length without clearance gap between roller and roller link plate by guiding the rollers in the same direction.
| When? |
|
|---|---|
| Why? |
|
| What happened if not replacing? |
|
| Notes |
|
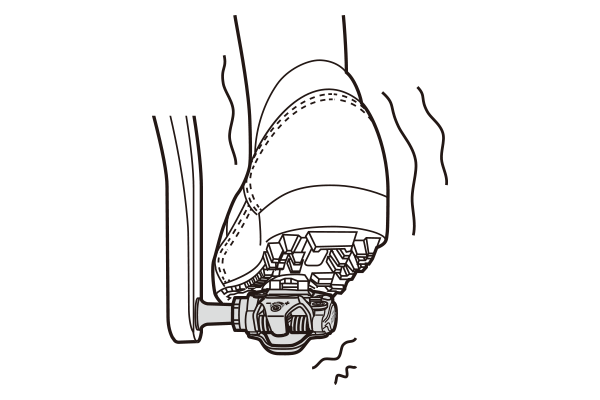
SPD-SL Cleat
Cleats wear out over time and should be replaced periodically. Cleats should be replaced when it becomes difficult to release, or it starts to release with much less effort than the when it was in new condition.
Cleat
Front
Rear
Section A

Note
If the yellow (SM-SH11) or red (SM-SH10) or blue (SM-SH12) portions of the cleats become worn, replace the cleats with new ones.
Front: Replace the cleats when the black layer underneath the cleats are visible.
Rear: Replace when section A in the illustration becomes worn.SPD Cleat
Cleats wear out over time and should be replaced periodically. Cleats should be replaced when it becomes difficult to release, or it starts to release with much less effort than the when it was in new condition.
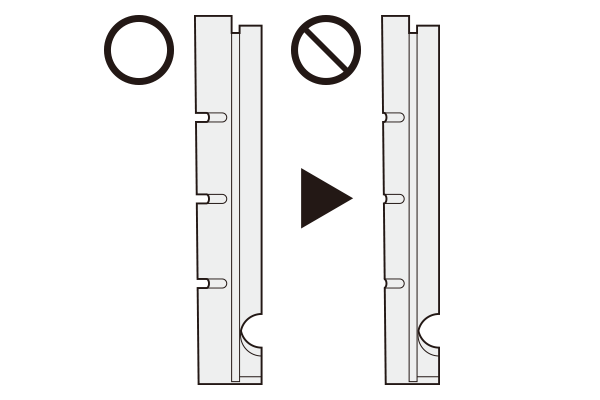
Brake Shoe
The optimum efficiency of the Multi-Condition Brake System can be realized by using the brakes and brake levers in the recommended set. If the brake shoes have worn down until the grooves are no longer visible, they should be replaced.
There are two different types of shoe and shoe holder to be used in the left and right positions respectively. Slide the new shoes into the grooves on the shoe holders while taking note of the correct directions and bolt hole positions.
When? - Before the grooves disappear
- Check with a professional mechanic at least once a year (depends on your riding conditions)
Why? - Sign of replacement
- Possibility of degradation
What happened if not replacing? - Not able to stop or control speed
- Accelerate rim wear, cracks in brake shoes
Mineral Oil
It is recommended that you replace the oil inside the reservoir tank if it becomes severely discolored. Attach a tube with a bag to the bleed nipple, and then open the bleed nipple and drain out the oil. You can operate the brake lever at this time to help the oil to drain out. After draining the fluid, pour in fresh brake fluid while referring to Technical Service Instructions “Adding the mineral oil and bleeding air”. Use only genuine SHIMANO mineral oil. Dispose of the waste oil according to proper country and/or state disposal regulations.
Disc Brake Pad & Rotor
If noise occurs during brake operation, the brake pads may have been worn down to the usable limit. Check that the brake system temperature has been cooled down sufficiently, check the thickness of the brake pad. If the thickness is 0.5 mm or below, the brake pad needs to be replaced with a new one. Consult a dealer or an agency.
If the disc brake rotor is cracked or deformed, immediately stop using the brakes and consult a dealer or an agency.
If the disc brake rotor becomes worn down to a thickness of 1.5 mm or less, or if the aluminum surface appears, immediately stop using the brakes and consult a dealer or an agency. The disc brake rotor may break, and you may fall off the bicycle.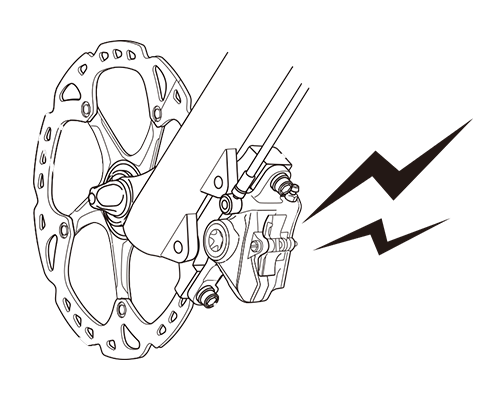
2 mm
0.5 mm
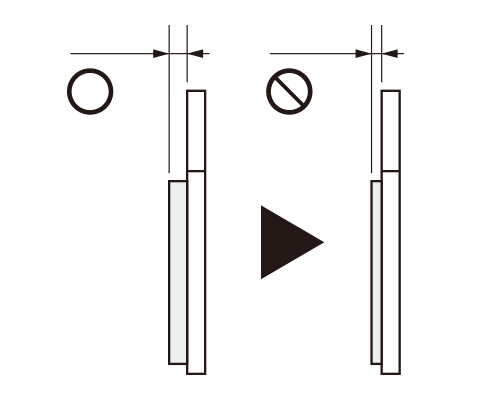
If oil adheres to the brake pads after oil is added, or if the brake pads are worn down to a thickness of 0.5 mm, or if the brake pad presser springs are interfering with the rotor, replace the brake pads.
When? - Pad material is less than 0.5 mm thick
Why? - Sign of replacement
What happened if not replacing? - Damage to a rotor (more expensive)
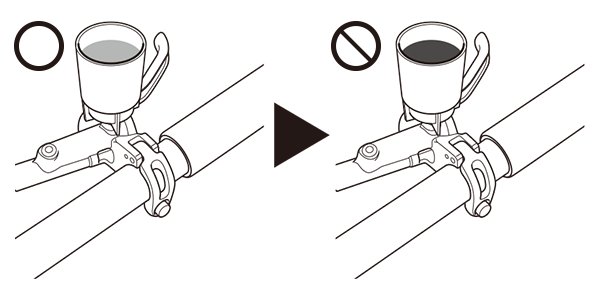
Cover with tongue (nose cap)
The covers with tongue that come with 12-speed and 11-speed rear derailleurs are there to keep the cables looking nice and cut down on the fuzziness. They are designed to be replaced with the cable, and every polymer coated cable we sell comes with a replacement cover with tongue in the package. File boxes come with a bag of them taped to the front.
Cover with tongue (nose cap)

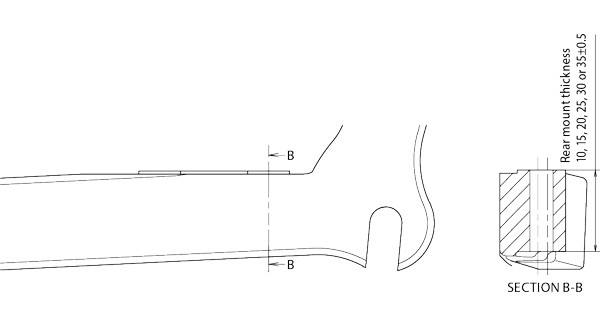
Rear mount thickness
Frames using the flat mount system will come with chain stays of different thicknesses which are determined by the manufacturer. They can be 10, 15, 20, 25, 30 and 35 mm. Bolt lengths for the appropriate frame thickness must be used.
Lock ring tool guide
There are three types of brake rotor fixing lock rings in our line-up. Each type requires a different tool for installation.
| Disc brake rotor fixing lock ring | Internally serrated type
|
Internally and externally serrated type*
|
Externally serrated type
|
||
|---|---|---|---|---|---|
| Lock ring tightening tool | For internally serrated type
TL-LR15 (Y12009230) + |
For internally serrated type
TL-LR11 (Y8PW04100) + |
For externally serrated type
TL-FC36 (Y13098000) |
||


* Included with SM-RT30 and SM-RT10
Tools required for assembly
In recent years, there have been increasing opportunities to assemble SHIMANO products into frames/parts of various shapes. For this reason, the number of dedicated tools required for assembly has increased. Please check the required tools again at each retailer.
| Di2 | ||
|---|---|---|
| E-TUBE kit | For connecting the bicycle (system or components) to a PC via a PC linkage device | IETUBEKIT4EB (English) IETUBEKIT4GB (German) |
| ① Shift/Brake lever | ||
|---|---|---|
| TL-BR001 ① | Syringe unit for bleeding | Y13000080 |
| TL-BR002 ② | Funnel unit for ST (M7*0.75) | Y13000090 |
| TL-BR003 ③ | Funnel unit for BL (M5*0.8) | Y13000100 |
| ① ② ③ KIT | TL-BR001, TL-BR002, TL-BR003, 4 types of bleeding spacers | Y13098630 |
| TL-BH62 | Disc brake hose cut & set tool | Y13098570 |
| ② Brake caliper | ||
|---|---|---|
| Bolt length selector for rear | Y8N221000 | |
| ③ Disc brake rotor | ||
|---|---|---|
| TL-FC36 | Lock ring tool for externally spline type | Y13098000 |
| TL-LR15 | Lock ring tool for internally spline type | Y12009230 |
| TL-LR11 | Lock ring tool for internally/externally spline type for SM-RT10/30 | Y8PW04100 |
| ④ Bottom bracket | ||
|---|---|---|
| TL-FC36 | HOLLOWTECH II/2-PIECE CRANKSET bottom bracket cup tool | Y13098000 |
| TL-FC24 | Bottom bracket cup tool (adaptor) for BB-R9100 | Y13009240 |
| TL-FC25 | Bottom bracket cup tool (adaptor) for SM-BBR60 | Y13009260 |
| TL-BB12 | Press-fit bottom bracket installation tool | Y13098255 |
| TL-BB13 | Press-fit bottom bracket removal tool | Y13098262 |
| TL-UN74-S | Cartridge bottom bracket tool | Y13009073 |
| ⑤ Crankset | ||
|---|---|---|
| TL-FC18 | HOLLOWTECH II/2-PIECE CRANKSET crank arm tool | Y13098280 |
| TL-FC11 | Cotterless/OCTALINK crank arm extractor | Y13098210 |
| TL-FC23 | Chainring bolt T30 wrench with 5 mm hex | Y13098230 |
| TL-FC40 | Power meter crank arm tool | YEZY00017 |
| ⑥ Cassettes | ||
|---|---|---|
| TL-LR15 | Lock ring tool | Y12009230 |
| TL-SR24 | 9-12-speed compatible sprocket remover | Y13098730 |
| ⑦ Chain | ||
|---|---|---|
| TL-CN35 | 9-12-speed compatible professional chain tool | Y13098710 |
| Spare pins (10 pins) for TL-CN35, TL-CN34 | Y13098551 | |
| TL-CN10 | QUICK-LINK connecting & removing pliers | Y13022000 |
| TL-CN42 | Chain wear indicator | Y12160000 |
| Others | ||
|---|---|---|
| TL-RD11 | Rear dropout alignment tool | Y13098270 |
| TL-CT12 | Cable cutter | Y09898010 |