Configuring power measurement accuracy improvement
Setting up a power meter using E-TUBE PROJECT Cyclist


Configuring power measurement accuracy improvement
You can improve the accuracy of power measurement by pairing a SHIMANO power meter* with a compatible Di2 rear derailleur*.
*Target products: FC-R9200-P/FC-R8100-P/RD-R9250/RD-R8150/RD-R7150
*You can register the bicycle as My bike to use more functions, such as those for registering bicycle information and sharing data with other SHIMANO applications.
Procedure for creating a SHIMANO ID and registering the bicycle as My bike
Note: This procedure requires E-TUBE PROJECT Cyclist Ver.5.2.3 or later.


Update the firmware of the rear derailleur
Start E-TUBE PROJECT Cyclist.
If this screen is displayed, the initial settings of the application are complete. Proceed to step 1-2.
Notice -1
The following initial settings are required the first time that the application is started.
Notice -2
*If a screen such as the following is displayed, procedure B applies.
Click here to continue with the procedure.
Set the Di2 bicycle to the Bluetooth® LE connection mode.
Press and hold the function button until the LED flashes blue.
Connect E-TUBE PROJECT Cyclist with the Di2 bicycle via the Bluetooth® LE.
Update the firmware of the Di2 rear derailleur from the UPDATE tab.
If the firmware is already the latest version, proceed to step 2.
Notice
1. Do not operate your smartphone during a firmware update.
If you use other applications and force E-TUBE PROJECT Cyclist into the background, the update may fail.
2. Leave your smartphone near the rear derailleur and do not move it away during a firmware update.
Enable ANT communication for the rear derailleur
Enable ANT communication for the rear derailleur.
If the wireless communication method is already set to ANT+/Bluetooth® LE, tap [Disconnect] and proceed to the next step.
Update the firmware of the power meter
Connect E-TUBE PROJECT Cyclist with the power meter via Bluetooth® LE.
Press the button of the power meter control unit to enable the Bluetooth® LE connection mode.
Update the firmware of the power meter.
If the power meter has the latest firmware, skip this step and proceed to step 4-1.
Notice
1. Do not operate your smartphone during a firmware update.
If you use other applications and force E-TUBE PROJECT Cyclist into the background, the update may fail.
2. Leave your smartphone near the rear derailleur and do not move it away during a firmware update.
Pair the power meter and rear derailleur
Pair the power meter with the Di2.
Disconnect the E-TUBE PROJECT Cyclist from the power meter.
Tap [DISCONNECT].
Configuration is complete.
Update the firmware of the rear derailleur
Start E-TUBE PROJECT Cyclist.
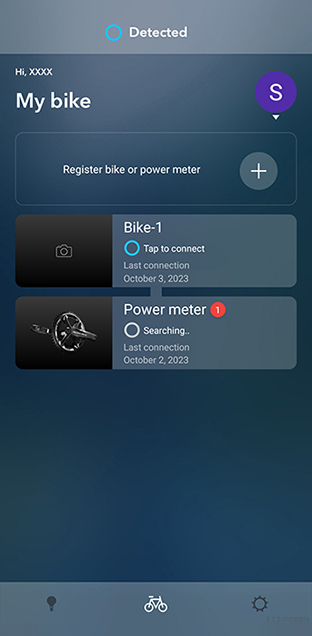
The bicycle registered as My bike is displayed.
Notice
The bicycle registered as My bike is only displayed if you are logged in to the application with a SHIMANO ID.
Follow the procedure below to log in to the application.
Set the Di2 bicycle to the Bluetooth® LE connection mode.
Press and hold the function button until the LED flashes blue.
Connect E-TUBE PROJECT Cyclist with the Di2 bicycle via the Bluetooth® LE.
Notice
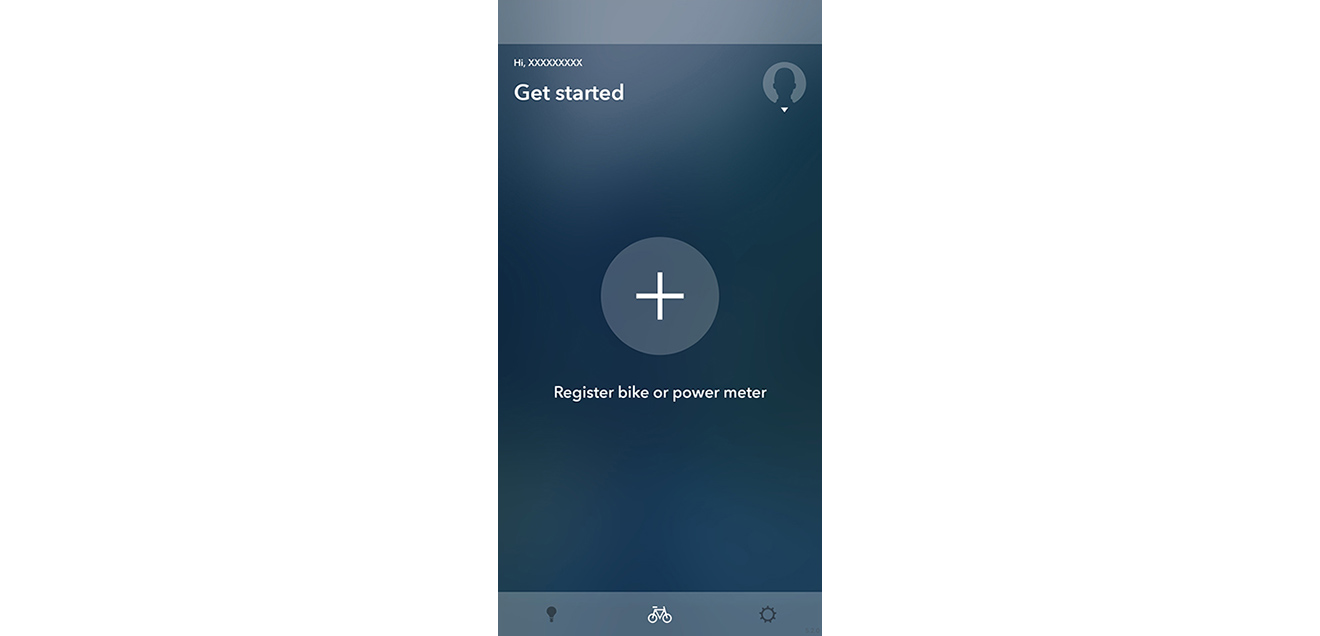
If a screen such as the following is displayed at this stage, the connected bicycle is not registered as My bike or the application is not logged in to a SHIMANO ID.
Log in to SHIMANO ID and start the procedure again, or proceed from step 1-3 of procedure A.
Proceed to the [Power accuracy improvement] screen and update the firmware of the Di2 rear derailleur.
If the firmware is already updated, the procedure automatically proceeds to step 6.
Notice
1. Do not operate your smartphone during a firmware update.
If you use other applications and force E-TUBE PROJECT Cyclist into the background, the update may fail.
2. Leave your smartphone near the rear derailleur and do not move it away during a firmware update.
Enable ANT communication for the rear derailleur
Enable ANT communication for the rear derailleur.
If the wireless communication method is already set to ANT+/Bluetooth® LE, tap [Disconnect] and proceed to the next step.
Tap [Enable ANT communication].
Disconnect the bicycle.
If the firmware is already updated, the procedure automatically proceeds to step 6.
Notice
If both steps 1 and 2 were not required, the following dialog box indicating that the rear derailleur settings are complete is displayed.
Tap [OK] to close the dialog box, then tap [DISCONNECT].
The bicycle is disconnected, and the bicycle registration screen is displayed.
Update the firmware of the power meter
Connect E-TUBE PROJECT Cyclist with the power meter via Bluetooth® LE.
Press the button of the power meter control unit to enable the Bluetooth® LE connection mode.
Update the firmware of the power meter.
If the power meter has the latest firmware, skip this step and proceed to step 4.
Notice
1. Do not operate your smartphone during a firmware update.
If you use other applications and force E-TUBE PROJECT Cyclist into the background, the update may fail.
2. Leave your smartphone near the rear derailleur and do not move it away during a firmware update.
Pair the power meter and rear derailleur
Pair the power meter with the Di2.
Disconnect the E-TUBE PROJECT Cyclist from the power meter.
Tap [DISCONNECT].
Configuration is complete.
Procedure for creating a SHIMANO ID and registering the bicycle as My bike with E-TUBE PROJECT Cyclist
You can log in to the E-TUBE PROJECT application with a SHIMANO ID* to use more functions, such as those for registering bicycle information and sharing data with other SHIMANO applications.
*Some application functions are only available by logging in with a SHIMANO ID.
Click here to check if SHIMANO IDs are available in your area.
Tap the E-TUBE PROJECT Cyclist icon to start the application, then display the SHIMANO ID PORTAL screen.
If you are starting the application for the first time
If you have used the application before
Perform the SHIMANO ID registration procedure.
Log in to the application with the registered ID and password.
Tap the E-TUBE PROJECT Cyclist icon to start the application.
If this screen is displayed, you are logged in to the application with a SHIMANO ID. Proceed to step 2.
Notice
The bicycle can only be registered as My bike if you are logged in to the application with a SHIMANO ID.
Follow the instructions below to log in.
Set the Di2 bicycle to the Bluetooth® LE connection mode.
Press and hold the function button until the LED flashes blue.
Register the Di2 bicycle as My bike.
Connect with the power meter.
Connect the power meter to the application, and assign it to the bicycle registered as My bike in the previous procedure.
* A passkey is a 6-digit number that you need to enter on your smartphone when pairing your smartphone with a Bluetooth® device such as a wireless unit.
The default passkey is “000000” but you can set a passkey of your choice.
**By saving the passkey to the server, you can skip passkey entry, even when you change your smartphone, etc.